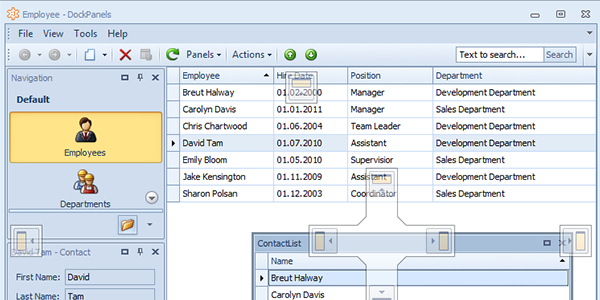
Dock Panel term in Xafari refers to additional custom View that displays within freely positioned containers. Dock Panel is always accompanied by a certain "main" View or specified business object. It provides the user with access to additional useful information, at the same time a dock panel does not occupy the client area of the main window. Adding and customization of a dock panel is made entirely in the Application Model. A developer can set a master-detail relationship between the data in the main View and the dock panel.
The user can move a dock panel and attach it to different areas of the parent window. The image below shows different variants of dock panels placement in a Win application.
Web application with dock panels:
The user can also temporarily hide a dock panel and thus easily customize the application interface in accordance with personal requirements.
If moved to any location on the screen that is far enough away from the edges of the main window, the dock panel will remain floating and will be displayed in its own window, independent of the main one. If the dock panel is no longer needed, it can be removed from the screen.
Special Action, called Panels, is intended to manage dock panels: open and close.
How to Add a Dock Panel
In order to add dock panels functionality to an application, follow the steps below.
- Add XafariDockPanelsModule to Module Project
- Add XafariDockPanelsWinModule to Windows Forms Application Project
- Add XafariDockPanelsWebModule to Web Forms Application Project
Xafari.DockPanels provides three main use cases:
- Add the Dock Panel to a business object
- Add the Dock Panel to a certain View
- Add the Dock Panel to the main window
Invoke Model Editor and navigate to the required node, it may be a business object, View or Xafari|DockPanels. Add a new item to the Dock Panel node. The following picture demonstrates adding a new dock panel to Employee business object and Employee_ListView nodes:
The image below illustrates adding a dock panel to Xafari|DockPanels node.
Dock Panels in a Web Application
To use Dock Panels in a Web application you need to perform additional operations. It is necessary that ASP.NET Template Content implements IDockManagerHolder interface. Let’s consider one of the ways to do this.
Add new DevExpress XAF ASP.NET Default Template Content to Web Application Project (i.e. ProjectName.Web.App), name it DefaultVerticalTemplateContent. Modify .ascx-file as follows:
- Add ASPxDockZone to provide a feature to fix the panel on the page. Add UpdatePanel and ASPxDockZone to <div id=”Spacer”. . ./> block:
• • •
- Add ASPxDockZone to <div id="LP" class="LeftPane" . . ./> block:
• • •
• • •
• • •
- Since the application works with Xafari, replace all ActionContainerHolder with XafariActionContainerHolder. Note that <div id="VerticalTemplateHeader". . ./> block requires additional modifications. Replace cc2:ActionContainerHolder with cc6:XafariActionContainerHolder and add Panels category, where Panels Action will be placed:
• • •
- Replace all other cc2:ActionContainerHolder on cc6:XafariActionContainerHolder
- Add ASPxDockManager, it allows you to control all the panels on the page:
The modification of the .ascx-file is completed. Now, see the .ascx.cs-files. Modify DefaultVerticalTemplateContent.ascx.cs and Default.aspx.cs files as follows:
public partial class Default : BaseXafPage, IDockManagerHolder
{
    . . .
    public ASPxDockManager DockManager
    {
        get
        {
            var manager = this.TemplateContent as IDockManagerHolder;
            return manager == null ? null : manager.DockManager;
        }
    }
}

public partial class DefaultVerticalTemplateContent : TemplateContent, IDockManagerHolder
{
    . . .
    public ASPxDockManager DockManager
    {
        get { return this.ASPxDockManager1; }
    }
}
Modify Session_Start method in Global.asax file. The following code demonstrates this:
protected void Session_Start(Object sender, EventArgs e)
{
    . . .
    WebApplication.Instance.Setup();
    WebApplication.Instance.Start();
    WebApplication.Instance.Settings.DefaultVerticalTemplateContentPath = "~/DefaultVerticalTemplateContent.ascx";
}
That's all. Now you can build and run your ASP.NET application, and work with dock panels.
Dock Panels and Win Tabbed MDI
XAF supports Win application mode with an interface in the form of tabs, i.e. each new window is opened in a separate tab. Image below demonstrates Department, Contacts and Employees business objects displayed within separate tabs.
To activate this view mode, it is enough to invoke Model Editor and set UIType property to “TabbedMDI” value.
However, TabbedMDI does not support Dock Panels. Image above shows that the Panels Action button does not accompany the Employee_ListView, despite the fact that there is Dock Panel for this entity.
The problem can be solved by adding a class:
public class DockPanelTabTypeUI : DetailViewForm, IDockManagerHolder
{
    DockManager IDockManagerHolder.DockManager
    {
        get
        {
            var dockManager = new DockManager();
            dockManager.DockingOptions.ShowCaptionImage = true;
            dockManager.Form = this;
            dockManager.TopZIndexControls.AddRange(new string[] {
            "DevExpress.XtraBars.BarDockControl",
            "DevExpress.XtraBars.StandaloneBarDockControl",
            "System.Windows.Forms.StatusBar",
            "DevExpress.XtraBars.Ribbon.RibbonStatusBar",
            "DevExpress.XtraBars.Ribbon.RibbonControl" });
            return dockManager;
        }
    }
}
Handle CreateCustomTemplate event in Windows Forms Application Project, modify WinApplication.cs file as follows:
public partial class DockPanelsWindowsFormsApplication : WinApplication
{
    private void DockPanelsWindowsFormsApplication_CreateCustomTemplate(object sender, CreateCustomTemplateEventArgs e)
    {
        if (e.Context == TemplateContext.View){
            e.Template = new DockPanelTabTypeUI();
        }
    }
}
Now you can build and run your Windows Forms applications, and see what they look like after these changes.
We hope this article was helpful. Don't hesitate to contact us in case you have any questions.
