
In one of the previous blog posts, we wrote how Ranet OLAP HTML Pivot Table can be integrated into an ASP.NET application. Now, let's see how to customize pivot table's frontend.
First of all, it is important to say that there are several ways to add the Pivot Table to client side application of your solution. AngularJS directive <ranetdynamicpivotgridapp ng-app="sampleDynamicPivotGrid”> is the first and the most convenient one.
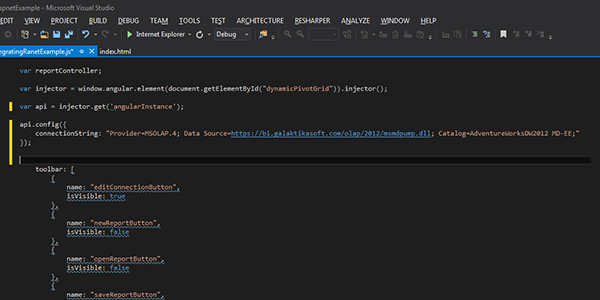
The directive settings are configured through provided API. To get the access to the API, you should obtain ranetAngularInstace through Angular.injector:


After you get the angular instance, you can use the following API methods:
• addNewPage(page)
This method adds a new preconfigured page in the report.
• deletePage(pageId, callback)
This method removes the page with given id from the report. After removal, the callback function will be executed.
• setSelectedPage(pageId)
This method sets the page with given id as active.
• config(config)
This method sets the configuration of the directive. Settings are passed via config object.
Now let’s try and configure the Pivot Table via API in practice.
First of all, we should configure the directive itself. Let’s set connection string.
In order to do this, we should pass a directive configuration object, containing connectionString field:


Then let’s set visibility of the buttons on the toolbar. To do this we should pass a directive configuration object containing an object array, with each of the objects setting visibility of a specific button.


You are able to configure the following buttons:
- editConnectionButton
- newReportButton
- openReportButton
- saveReportButton
- toggleVisibilityActiveFiltersButton
- showCustomCalculationsEditorButton
- toggleVisibilityMetadataAndQueryDesigner
- layoutDesignerSelectorDropdown
- showCellConditionsDesignerbutton
- showExtensionSettingButton
- toggleRotateAxesButton
- pageSelectorDropdown
- showMdxQueryButton
- resetLayoutButton
- historyGroupButtons
- showSettingsButton
- exportDropdown
- importLayoutButton
- exportLayoutButton
- exportToExcelButton
- exportToXmlButton
- resetAllActionsButton
Beside the properties listed above, there are two functions to be configured. The first one is importing the report page from the storage manager. The second one is getting the identifier in terms of which your reports will be stored.


Now let’s add the page to the report. The page is set as follows:


Now add the configured page to the report:

Another way to customize pivot table is a JQuery plugin. It provides access to existing controls via JQuery object.
Some of our users may have applications built with frameworks different from AngularJS. That’s why, besides changing pivot table with AngularJS directive, there is another implementation of Ranet Pivot Table as JQuery plugin. This implementation allows users to integrate the Pivot Table regardless of the chosen architecture of the application or the stack of technologies used. To include this plugin in the application, you should call the following method on the required JQuery object and pass Ranet Pivot Table configuration object to this method.


page1 and page2 are the same pages as given above.
You can find more details about configuring JQuery plugin at the ranetDynamicPivotGrid.jquery.html page.
We hope this article was helpful for you, and don’t hesitate to contact us in case you have any questions about customizing Ranet HTML Pivot Table using AngularJS or jQuery.