Download
| Version | Size | Link to download |
| 7.1.0-alpha56 | 61.5 MB | Ranet.Dashboards.Desktop.7.1.0-alpha56 |
Preparing for deployment
Unpack the Ranet.Dashboards.Desktop.zip archive containing the components and resources of the Ranet Dashboards for Desktop application to the Ranet.Dashboards.Desktop folder on the target computer (physical server or workstation) that will be used as a web server and IIS components are installed on it .
The next step is to deploy the server.
Server Deployment
The guidance is based on general assumptions that the infrastructure for deploying Ranet Dashboards for Desktop is adequate.
- Internet Information Services
Add a web application
Deploy the web application to IIS using the physical path of the Server folder from the application deployment package.
- Start typing iis in the search bar next to the Start button. The Internet Information Services (IIS) Manager window opens. Click on it to open it.
Run IIS Manager - Open the Sites > Default Web Site node.
- Open the context menu and select the Add application command.
In the window that opens, configure the web application settings.
| Alias | Alias Specify an alias for the web application. Following the example of the Ranet.Dashboards.Desktop manual |
| Application pool | Application pool Select .NET 4.5 Classic pool |
| Physical path | Specify the full path to the Server folder from the application's deployment package. Following the example of the guide \Ranet.Dashboards.Desktop\Server |
* If the .NET 4.5 Classic Application pool is not available for selection, verify the Windows Components for IIS installation as recommended by Deploying IIS.
Set up authentication options
Configure the authentication settings for the newly created web application.
| Name | Status |
| Anonymous Authentication | Disabled |
| ASP.NET Impersonation | Enabled |
| Basic Authentication | Disabled |
| Digest Authentication | Disabled |
| Forms Authentication | Disabled |
| Windows Authentication | Enabled |
By default, the Ranet Dashboards for Desktop application is configured for Windows authentication, so the user is automatically authenticated to the system.
If the deployment scenario differs from the default scenario, configure the web application configuration file manually according to the Web-config configuration section.
After deploying the application to IIS, test the functioning of the Windows Communication Foundation (WCF) web services, for example:
http://localhost/Ranet.Dashboards.Desktop/SolutionRepositoryService.svc
Set up user roles
Select the current application deployment directory, and in it the folder Server > App_Data
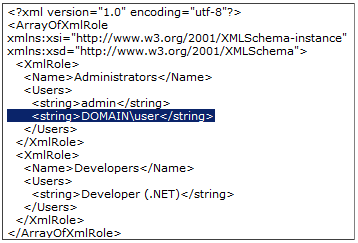
In the roles.xml file, configure the user roles that will have System Administrator rights and access to the dashboard designer services. Why add the appropriate domain users.
Learn about the directory structure of the Ranet Dashboards for Desktop application.
Update license file
To enable users to work in Ranet Dashboards for Desktop, you will need a license file.
A license file is not required if you installed the applications locally for a single user. In addition, you can request a temporary license file for the period of users' evaluation of the application.
For more information about app licensing, see Use License.
Connect demo examples
Ranet Dashboards for Desktop comes with demo configurations. To familiarize yourself with them, you will need Adventure Works sample databases for MS SQL Server. Instructions for their deployment and configuration are described in the Demo bases section.
NOTE
Demo examples, if needed, can be included after the application has been deployed. You can create a new project with connections to your own data sources.
Further actions
Having deployed the server, you can proceed to setting up the configuration files of the client application and connecting clients - users of the system. Use the following guides:
Deploying the Ranet Dashboards for Desktop Client Application
License file for the Ranet Analytics demo can receive from our website GetLicense. The license file (license.bi) will be generated on the basis of the provided information and will be send by e-mail. Just put it in Web Application directory and restart IIS (iisreset).
After installing Ranet Analytics, before running the application, you must manually add Domain Users to the group Administrators.
- Open the file Roles.xml in a text editor (the file is located in the subfolder C:\Program Files (x86)\Galaktikasoft\Ranet Analytics v5.5%\BMWebApp\App_Data\);
- Identify the Users who will have Administrator rights web-application;
- In the role of the Administrators group, add the appropriate Domain User in the format as shown in the highlighted text in the image below.


