
Introduction
This guide explains how to create a simple application that is based on the Xafari framework. During the development process, you will become familiar with both conceptual ideas and some specific features. The lessons below assume that you have basic experience of .NET and .
Dependencies and Prerequisites
- .NET Framework and any non-Express version of Microsoft Visual Studio is installed on your machine.
- is installed on your machine.
- Xafari Framework that are consistent with the DevExpress is installed on your machine. The digits before zero in the version number of Xafari specify the required version of DevExpress. For instance: DevExpressComponents-15.2.9 and Xafari.Framework-15.2.9011.542.
- Any is installed and accessible from your machine to store the application data (a LocalDB or SQL Server Express instance is recommended).
If you need assistance with your Xafari application, submit a new ticket to the Support Center.
Xafari Solution Wizard
From the Visual Studio main menu, select File | New | Project... to invoke the New Project dialog. In the Installed tree, expand a Visual C# Items language node and choose Xafari. Select Xafari vXX.X.X011 ERP Solution Wizard, specify the new solution's name - "XafariSample", and click OK.
Choose the target platform(s) on the Solution Wizard's first page. In addition to the basic Win and Web platforms, Xafari Solution Wizard exposes a few variants: MVC, Console and Application Support. Choose the Windows and Applications Support platforms and click Next.
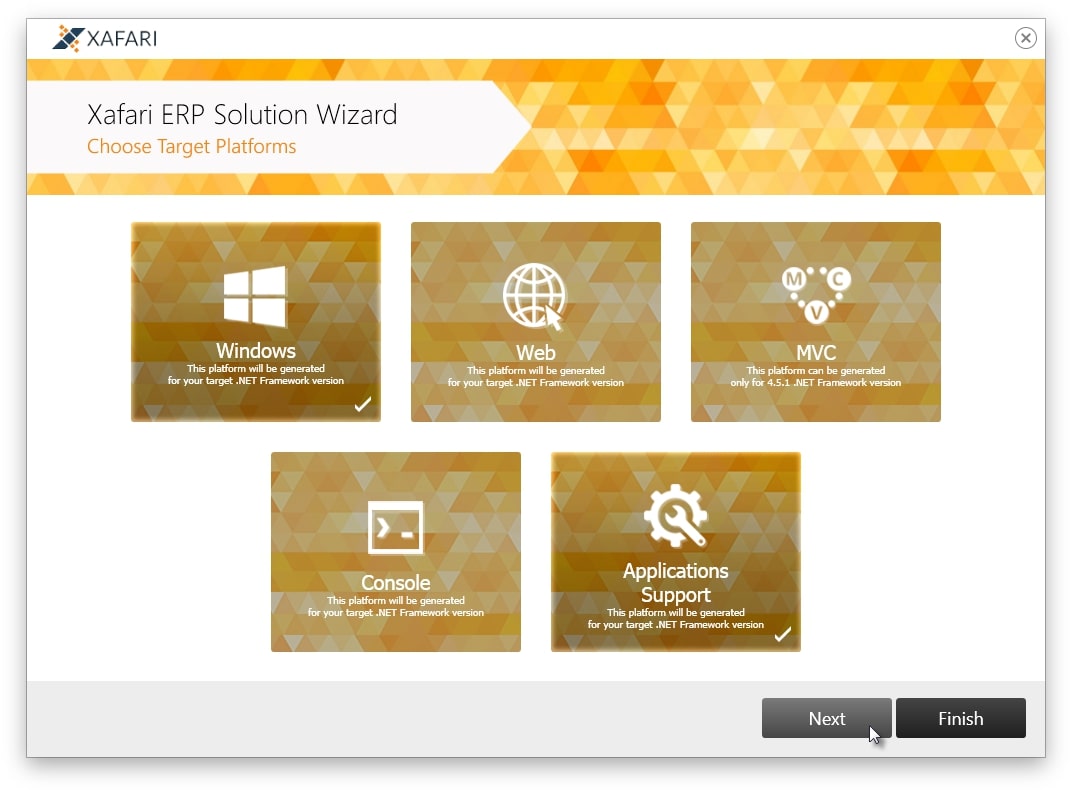
Application Support is a project of an auxiliary Win application that will take over all the functions related to administration, such as editing a model, managing security system objects, configuring business functions, etc. This is called XAS and if this is available, the target app will only provide business user’s functions.
Next step requires to choose ORM system, select Domain Components and click Next.
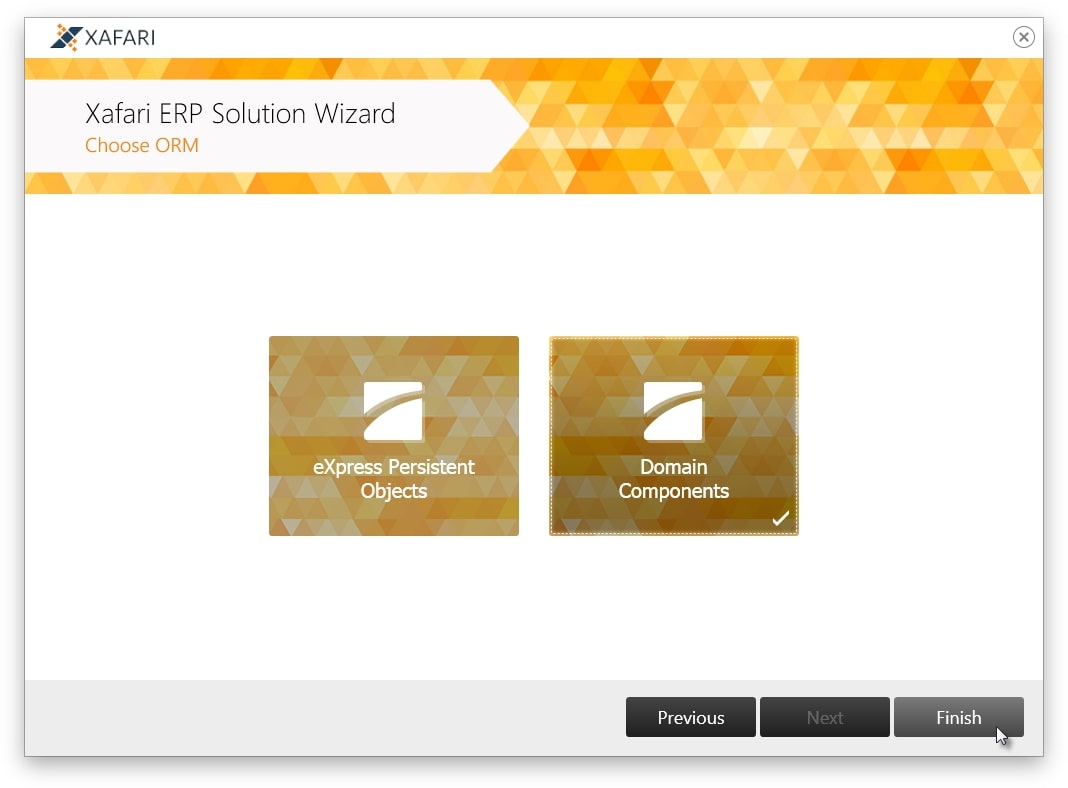
One of the conceptual features of Xafari is to ensure the operation of all services and subsystems for both canonica and . Moreover, Xafari contains some tools and technologies that extend the use of Domain Components. Some of these will be demonstrated in this guide.
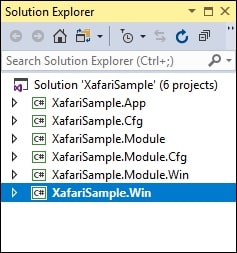
The Solution Wizard creates a solution with the following projects:
Refer to the Xafari ERP Concepts documentation section for more information on projects an Xafari solution contains.
Data Model. Domain Components and eXtensions Framework
This guide describes a modeling approach that uses and eXtensions Framework. The main types of objects in the system are declared as Entities. If it is necessary to obtain a new type based on the existing one, it is proposed to create an Extension and describe the required properties and functions in it, and associate the Extension to the Entity. This allows to flexibly expand the Entity in additional modules, while both the user and the system always deal with the whole Entity, regardless of the set of extensions that complement it. Rejection of inheritance eliminates a significant number of intermediate classes. The eXtensions Framework provides a convenient mechanism for registering Entities and Extensions, and supports these constructions at all stages of the development and application life cycle.
It should be noted that the other Xafari features described in this guide will also work successfully with the data model defined through XPO.
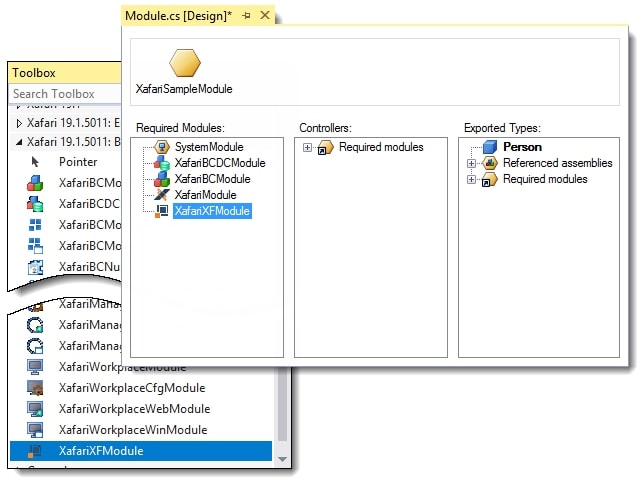
Add the XafariXFModule and XafariBCDCModule to your XafariSample.Module project.
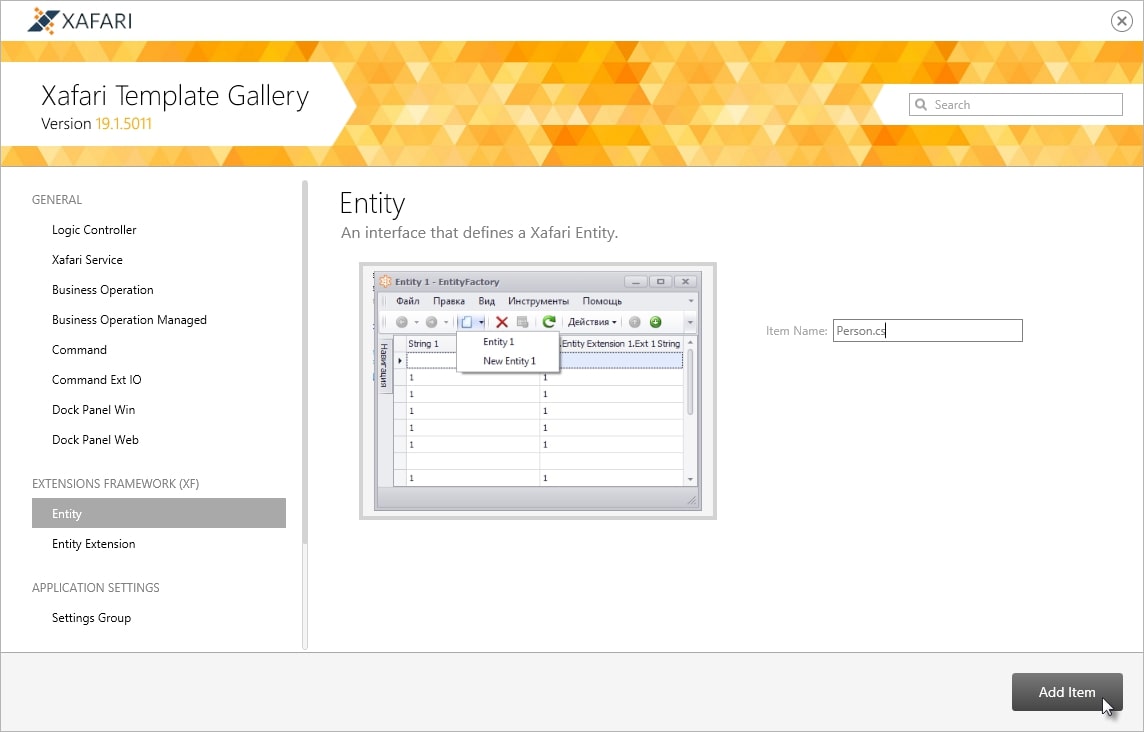
In the Solution Explorer, right-click the BusinessObjects folder in the XafariSample.Module project, and invoke Add | New item dialog. In the Installed | Templates tree, expand the Visual C# Items node, click the Xafari section and select the Xafari Template Gallery in the right pane. Then choose the EXTENSIONS FRAMEWORK | Entity template, specify Person.cs as the new item's name and press Add Item. As a result, you will get an automatically generated code file with a Person interface declaration.
Replace the auto-generated file content with the following code:
1 2 3 4 5 6 7 8 9 10 11 12 13 14 15 16 17 18 19 20 21 22 23 24 25 26 27 28 29 30 31 32 33 34 35 36 37 38 39 40 41 42 43 44 45 46 47 48 49 50 51 52 53 54 55 56 57 58 59 60 61 | [DomainComponent] [NonPersistentDc] [RegisterEntity] public interface Person : IXFEntity { string FirstName { get; set; } string LastName { get; set; } string MiddleName { get; set; } Sex Sex { get; set; } [ModelDefault("PredefinedValues", "Mr.;Mrs.;Dr.;Sir")] string Title { get; set; } [RuleRange("1754-01-01", "9999-12-31")] DateTime BirthDay { get; set; } [ModelDefault("AllowEdit", "false")] [ModelDefault("RowCount", "0")] string FullName { get; set; } string PersonalNumber { get; set; } [ModelDefault("AllowEdit", "false")] [ModelDefault("RowCount", "0")] string ShortName { get; set; } } public enum Sex { Male, Female } [DomainLogic(typeof(Person))] public class PersonLogic : DomainLogicBase { public PersonLogic(Person instance) : base(instance) { } void UpdateNames() { Instance.FullName = string.Format("{0} {1} {2}", Instance.LastName ?? string.Empty, Instance.FirstName ?? string.Empty, Instance.MiddleName ?? string.Empty).Trim(); Instance.ShortName = string.Format("{0} {1}.{2}.", Instance.LastName ?? string.Empty, string.IsNullOrWhiteSpace(Instance.FirstName) ? string.Empty : Instance.FirstName.TrimStart().Substring(0, 1).ToUpper(), string.IsNullOrWhiteSpace(Instance.MiddleName) ? string.Empty : Instance.MiddleName.TrimStart().Substring(0, 1).ToUpper()).Trim(); } public void AfterChange_FirstName() { UpdateNames(); } public void AfterChange_LastName() { UpdateNames(); } public void AfterChange_MiddleName() { UpdateNames(); } } |
| API | Description |
| RegisterEntityAttribute | Automatically registers an Entity in the system |
| IXFEntity | Base class for Entity |
Similarly, add the Job, Department and Employee Entities. Replace the automatically generated definition with the following code:
Job:
1 2 3 4 5 6 7 8 | [DefaultClassOptions] [DomainComponent] [RegisterEntity] public interface Job : ClassifierItem { } |
| API | Description |
| ClassifierItem | Recommended base DC for business objects. Provides many Xafari features by default. Among other things, it supports the IXFEntity interface. |
Department:
1 2 3 4 5 6 7 8 9 10 11 12 13 | [DefaultClassOptions] [DomainComponent] [RegisterEntity] public interface Department : HierarchicalClassifierItem { [ParentProperty] Department Parent { get; set; } [ChildrenProperty] IList Children { get; } IList Employees { get; } Employee Manager { get; set; } } |
| API | Description |
| HierarchicalClassifierItem | Extends the ClassifierItem capabilities. This DC additionaly derives from the IHierarchyNode interface, which declares the definition of a tree-like hierarchical structure of objects. IHierarchyNode data is supported by special service and List Editors that provide a number of unique features and high performance. |
| ParentPropertyAttribute | Specifies a reference to the parent object when describing a hierarchical dependency |
| ChildrenPropertyAttribute | Specifies a collection of children objects when describing a hierarchical dependency |
Employee:
1 2 3 4 5 6 7 8 9 10 11 | [DefaultClassOptions] [DomainComponent] [XafDefaultProperty("ShortName")] [RegisterEntity] public interface Employee : Person { [VisibleInDetailView(true)] Department Department { get; set; } Job MainJob { get; set; } } |
Thus, the basic schema of the Data Model is defined. In the next topics it will be slightly modified with the use of Extensions.
Right-click the XafariSample.Win project and start application.
For more information, see: eXtensions Framework, Hierarchical Data.
Smart Design. Declarative Approach on View Customization
In XAF, the auto-generated Views shows all properties by default. In situations where a set of items (columns) or their layout does not suit the customer, or additional forms are required, this entails the need to customize the Application Model. And there may be situations when the default UI has to be redesigned completely.
Xafari Smart Design module allows you to manage these aspects during the development phase of business classes. This topic introduces some of its features.
Add the XafariSmartDesign module to the XafariSample.Module project, build project.
Add the SmartDesignStrategyAttribute to the AssemblyInfo.cs file, set Type parameter to the “XafariSmartDesignStrategy” value. The following code demonstrates how to do this:
1 | [assembly: SmartDesignStrategy(typeof(XafariSmartDesignStrategy))] |
Modify Department.cs file, decorate Department class with CreateListView and CreateDetailView attributes as shown below:
1 2 3 4 5 6 7 8 | [CreateListView(Layout = "Code;Name;Manager")] [CreateDetailView(Layout = "HierarchyFullName;Code;Name;Description;Parent;Manager;GIS;Children;Employees")] [CreateListView(Layout = "Code;Name", ListViewType = ListViewType.LookupListView)] public interface Department : HierarchicalClassifierItem { //... } |
| API | Description |
| SmartDesignStrategyAttribute | Sets the View generation strategy |
| CreateListViewAttribute | Configures the design parameters of the List View |
| CreateDetailViewAttribute | Configures the design parameters of the Detail View |
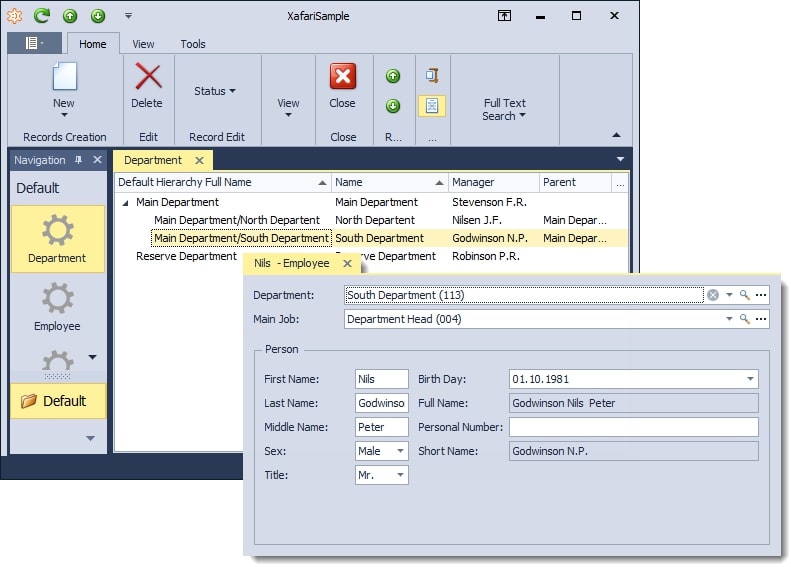
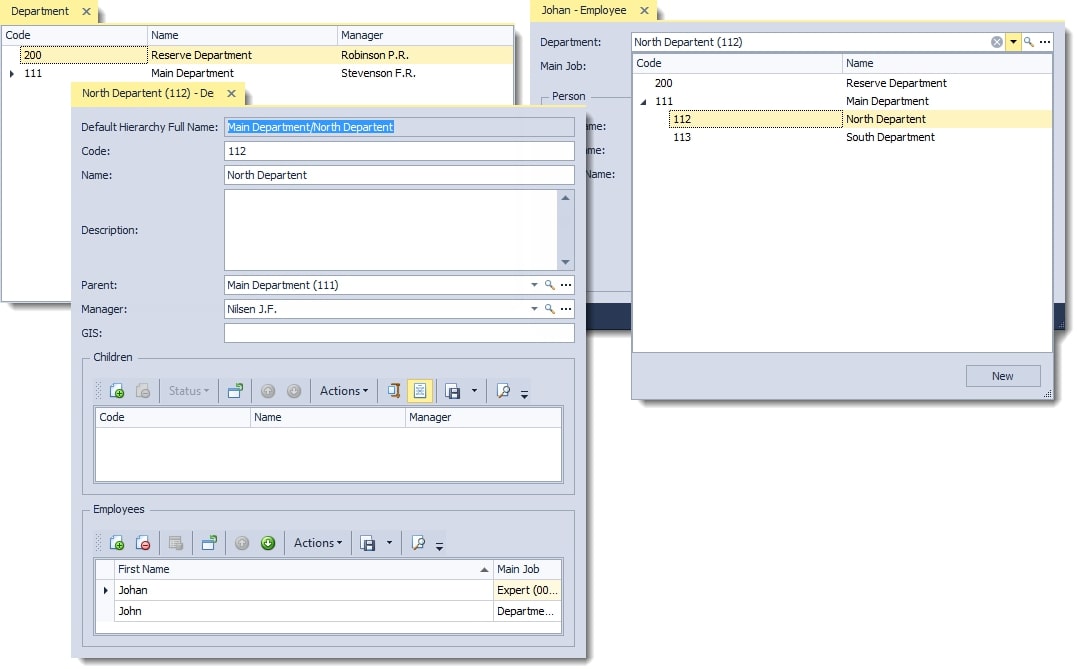
Run the application and examine the resulting design for the Department object’s Views.
Before changes:
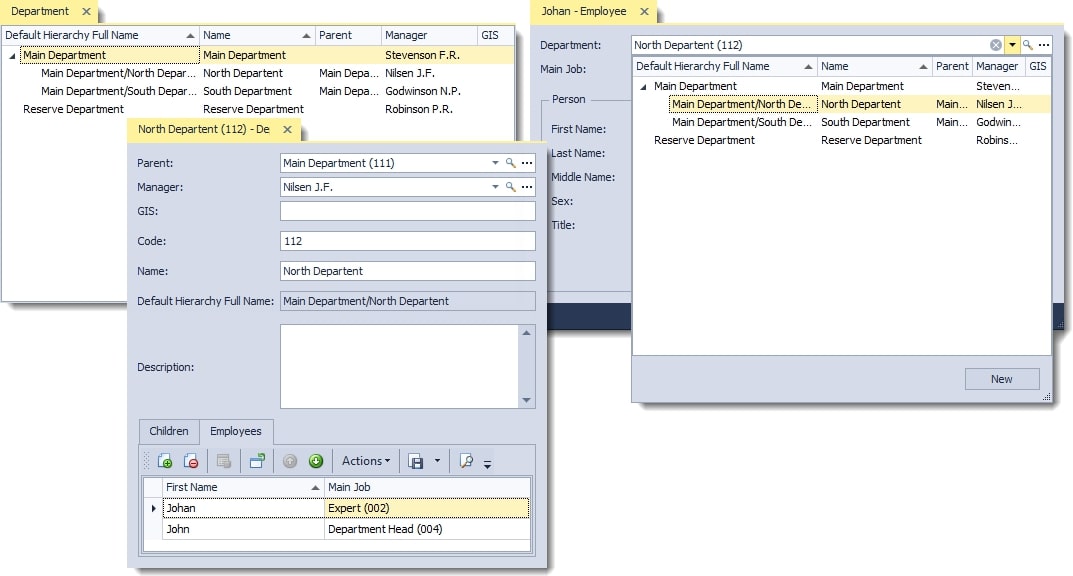
After changes:
After applying SmartDesignStrategyAttribute at the assembly level, all business classes contained in it will be displayed according to the specified rules. If no rules are defined, then empty View will be generated. Therefore, you should control the display of all objects.
The code snippet below demonstrates the settings for displaying an Employee object.
1 2 3 4 5 6 7 8 | [CreateListView(Layout = "PersonalNumber;ShortName;Department")] [CreateDetailView(Layout = "FirstName;LastName;MiddleName;FullName;Sex;PersonalNumber;Title;BirthDay;Description")] [CreateListView(Layout = "PersonalNumber;FullName", ListViewType = ListViewType.LookupListView)] public interface Employee : Person { //... } |
It is also possible to override the strategy at the individual class level. The code below means that Job objects will be displayed according to the standard XAF rules.
1 2 3 4 5 6 | [SmartDesignStrategy(typeof(XafSmartDesignStrategy))] public interface Job : ClassifierItem { } |
For more information, see: Smart Design.
AppModule and Security Settings
Xafari Framework aims to develop multi-platform ERP systems. The information system of a large enterprise requires a whole range of platform-specific target applications, each of these applications is designed to perform a certain set of tasks in a global context.
The idea of multi-platform is embedded in the architecture from the very beginning, which makes XAF a convenient starting technology for building such complex industrial solutions. In the development process, the need naturally arises for a single point of pre-platform configuration of all applications integrated into the global information system.
The solution presented in this guide contains two application projects: XafariSample.Cfg and XafariSample.Win. The common configuration point for both is the XafariSample.App module project. It contains the information necessary for the correct initialization of any target application as part of an ERP system: a connection string, a security system parameters etc. For more information, refer to the Xafari ERP Concepts documentation section.
The purpose of this topic is to set the parameters of the Security System in the XafariSample.App module project.
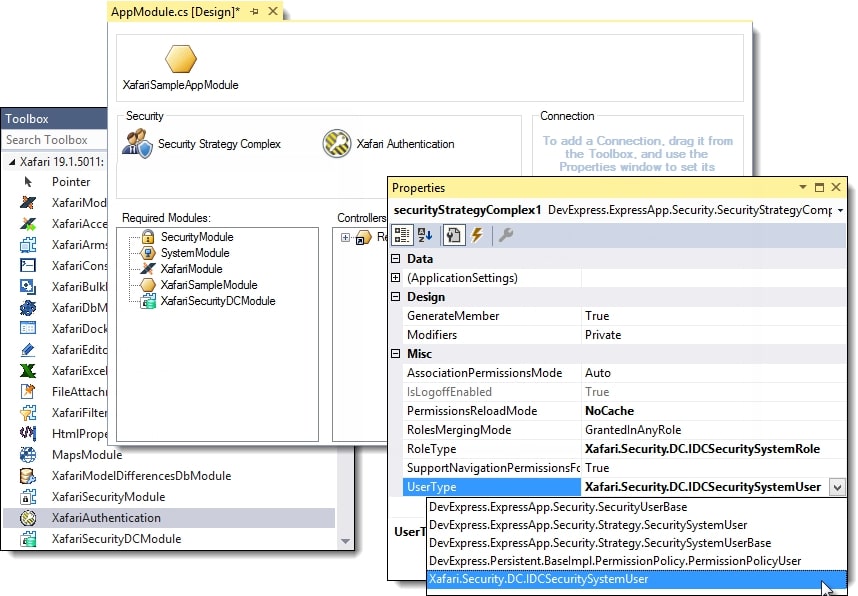
Invoke the Module Designer for the XafariSample.App module project. Drag the SecurityStrategyComplex component from the DX.19.1: XAF Security Toolbox tab to the Designer's Security section.
In the Properties Window, set the RoleType property to the “Xafari.Security.DC.IDCSecuritySystemRole” value and set the UserType property to the “Xafari.Security.DC.IDCSecuritySystemUser” value.
Drag the XafariAuthentication component from the Xafari: General tab to the Designer's Security section.
As a result, the Data Model of the Security System is defined via the Domain Components, this makes it easy to integrate its objects into the general scheme. For example, you can associate users, roles, etc. with other business objects of the system. The need to modify the IDCSecuritySystemUser type will arise further in the text. Additional roles and users will be added after these changes.
Xafari Authentication exposes a combined method for user login. This can be either Windows Authentication or Standard Authentication. The choice of authentication method is provided to the user.
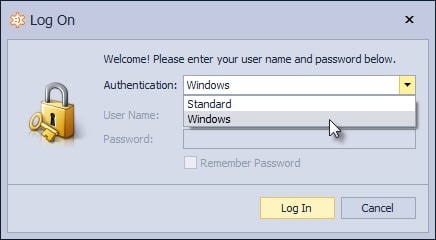
At the current stage, you can start the application and log in using Windows Authentication. By default, an Administrator role will be created for the current Windows account.
For more information, see: Xafari ERP Concepts, Xafari Security.
Docflow Document Entity
The Docflow module allows to interpret business processes as sets of Tasks that are performed during the Document processing. The life cycle of the Document is defined in the Schema, which can be designed at the deployment phase in accordance with the personal requirements of the customer. The main stages of using the Docflow subsystem are considered in the several topics.
Add the XafariDocflowModule to the XafariSample.Module project, build project.
The next step is to define the persistent class that will be the basis of the Document. Similar to the Data Model topic, add a new Entity to the XafariSample.Module | BusinessObjects folder, specify DocflowDocument as the new item's name and inherit it from the Document interface to provide the original set of properties. The following code snippet demonstrates DocflowDocument Entity declaration:
1 2 3 4 5 6 7 8 9 | [DefaultClassOptions] [DomainComponent] [RegisterEntity] [SmartDesignStrategy(typeof(XafSmartDesignStrategy))] public interface DocflowDocument : Document { } |
The Docflow Manager Service targets objects that implement the IDocflowSupport interface, those DocflowDocument needs to be improved. Following the concept of eXtensions Framework, implement the necessary functionality in the auxiliary Extension and attach it to the Entity.
Invoke the Add New Item dialog and activate Xafari Template Gallery, select the EXTENSIONS FRAMEWORK (XF)|Entity Extension template, set the Name to "DocflowExtension" and press Add Item. Declare the DocflowExtension interface as shown below:
1 2 3 4 5 6 7 8 | [DomainComponent] [NonPersistentDc] [RegisterExtension(typeof(DocflowDocument), PropertyName = "Contractor", BackPropertyName = "Entity")] public interface DocflowExtension : IDocflowSupportExtension { } |
API | Description |
Base DC for documents | |
Registers an Extension for the specified Entity | |
Extension that supports Docflow |
Build project and follow to the next topic.
Docflow Introduction
After successfully configuring the project, the Application Model will be extended by the Xafari|Docflow node. This topic briefly discusses the basic concepts used in process modeling.
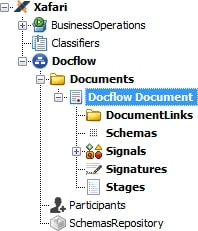
Expand the node and see its three sections:
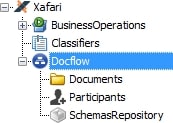
The Documents section has the primary meaning, as the functionality is implemented, this will turn into a complex tree-like structure. The Participants and the SchemasRepository items are auxiliary.
Documents
So, a Document is a persistent object equipped with special features that make it possible to guide it through a chain of Tasks, fixing the results. The DocflowDocument type has been declared in the Docflow: Axial Entity topic. Based on this type, you can define the Document.
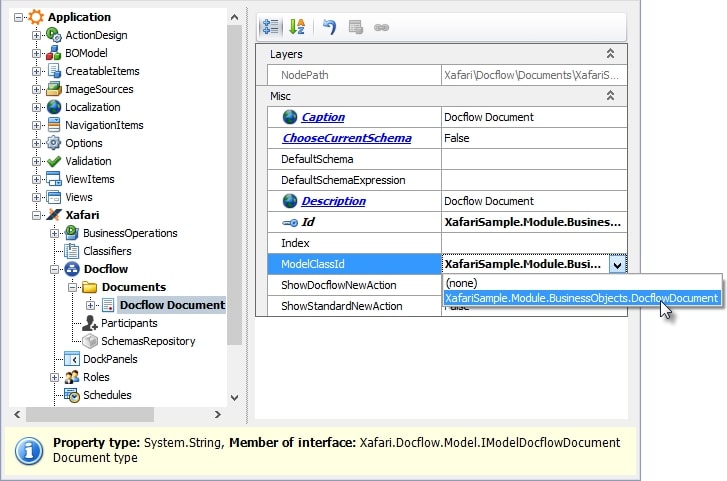
Invoke the Model Editor, navigate to the Xafari|Docflow|Documents node, and select Add… | Document in the context menu. For the newly created node, set the ModelClassId property to the “XafariSample.Module.BusinessObjects.DocflowDocument” value.
Expand the Docflow Document node and take a look the included items.
DocumentLinks
Modeling intricate processes often requires the use of several related Documents. The DocumentLinks collection stores the links of the current Document with others. Schemas of liked Documents can be synchronized with each other via the Signals. Related Documents are not considered in this guide.
Schemas
Schema determines the Document’s life cycle: Tasks to be completed, Signatures to be approved, Switches by Signals or conditions, etc. There can be several Schemas, so the Docflow mechanism assumes the ability to process the Document in several alternative scenarios.
The sequential linear Schema is described below in the Schema Design topic.
Signals
Signals provide the interaction of related Schemas, synchronize their flows. The Signal is a message that some event has occurred, the certain Schema can be subscribed to send or receive a Signal. Signals are not considered in this guide.
Stages
Stages allow to organize the execution plan of the Document. The Stage can be referenced from a Task, Signature or Schema.
To add an Stage to the Docflow Document, right-click the Stages node and select Add | Stage. For the new node, set the Id property to "Stage 1". Similarly add Stage 2 item. These elements will be used in the Schema Design topic.
Signatures
Signature represents the fact of verification of the Document by the responsible person or automatic operation. Signature has two main statuses, it is "accept" and "reject".
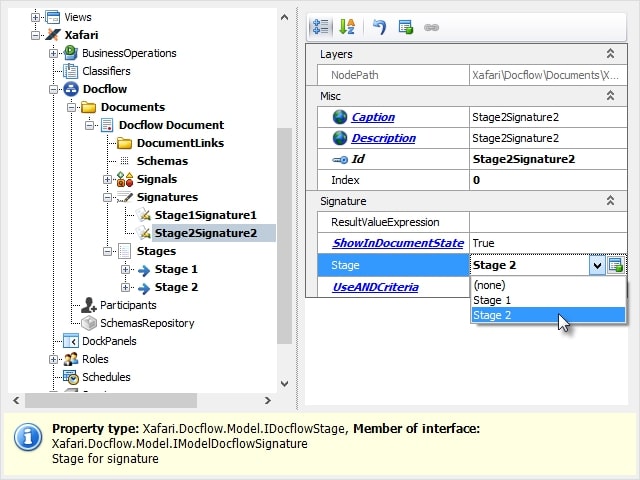
To add an Signature to the Docflow Document, right-click the Signatures node and select Add | Signature. For the new node, set the Id property to " Stage1Signature1" . Similarly add Stage2Signature2 item. These elements will be used in the Schema Design topic.
The image below shows Signatures and Stages nodes.
Participants
Participants collection contains values that can be used when designing Tasks. Each Task has the Executor property, which can be substituted with a value from the Participants node. Task Executors can be overridden in runtime.
It should be noted that the Participants items have a purely formal meaning, their use may be limited exclusively to the modeling phase, and this may have absolutely nothing to do with runtime. This feature should be explained in more detail.
The final goal of the Docflow service is to assign Tasks to certain users of the system. A reasonable decision seems to be to set a direct correspondence between Task Executors and Sesurity Users. Indeed, this is the main approach, which will be further used in the Docflow Participant Extension topic. However, if to deliver such a solution out of the box, it deprives the Docflow mechanism of flexibility, because the Docflow module does not know which security system is used in the application.
The basic approach is as follows. The Task Executor can be an object from the Task_TaskUserParticipant or TaskUserParticipant_TaskRoles table. You can synchronize these objects with the Participants collection manually or automatically. Further, in runtime, the Docflow service will compare the login of the current user with these objects. In case of coincidence, the appropriate Tasks will be displayed in the Task List of the current user and he will be able to start their execution. If the current user does not match any of the Participants, then his Task List will be empty. The developer may implement other mechanisms for calculating the Executor.
SchemasRepository
This collection is a repository for repeatable Schemas. SchemasRepository are not considered in this guide.
For more information, refer to the Docflow documentation section.
Docflow Participant Extension
This topic describes how to set correspondence between Participants and Security Users. In fact, Docflow allows to change the type of Participant, therefore, the task is to implement the IUserParticipant interface and extend the IDCSecuritySystemUser Entity, and then register this type as an Participant.
Add the XafariSecurityDCModule to the XafariSample.Module project, build project.
Add new Entity Extension to the XafariSample.Module project, set the created file name to ParticipantExtension and replace the autocreated code with the following code.
1 2 3 4 5 6 7 8 9 10 11 12 13 14 15 16 17 18 19 20 21 22 | [DomainComponent] [NonPersistentDc] [RegisterExtension(typeof(IDCSecuritySystemUser), PropertyName = "UserParticipant", BackPropertyName = "User")] public interface ParticipantExtension : IXFEntityExtension, IUserParticipant { [Calculated("UserName")] new string Name { get; } } public static class ParticipantExtension_Extensions { public static ParticipantExtension UserParticipant(this IDCSecuritySystemUser entity) { return entity.GetExtension<ParticipantExtension>(); } public static IDCSecuritySystemUser User(this ParticipantExtension extension) { return extension.GetEntity<IDCSecuritySystemUser>(); } } |
Modify the Setup() method of the XafariSampleModule class, the following code demonstrates how to do this.
1 2 3 4 5 | public override void Setup(XafApplication application) { base.Setup(application); application.Xafari().Tasks().UserParticipantType = typeof(IDCSecuritySystemUser); } |
API | Description |
Base DC for the implementation the participant’s features in the user object | |
Provides access to the Participant type |
After these changes, the Docflow service will consider System Users as Participants. Similar manipulations can be performed with the IDCSecuritySystemRole class.
XAS: Create Users
Now you can add several users and delegate processing of the Document to them. Generally, creating users in runtime is the task of the system administrator, it is provided via the appropriate UI, i.e. Views, Editors, and Controllers. As noted above, tasks of this kind can be transferred to the special Win application and Xafari supplies such an application, it is Xafari Applications Support (XAS).
The idea of XAS is to concentrate administrative functions in a separate application, regardless of the composition of the ERP system. XAS provides a unified approach to the administration of all business functions, it is aimed primarily at Xafari Services, but it is convenient for any new custom functions.
XAS is supplied with Xafari, it is located in the c:\Program Files (x86)\Top Soft LLC\Xafari Framework vXX.X.X0XX\Tools\XAS\ folder, by default. However, the XafariSample solution already contains the XafariSample.Cfg project that runs XAS from the source code. See this project.
XAS supports the concept of a single configuration for all applications in the system. The application is based on the settings specified in the AppModule, XafariCfgWinApplicationHost class creates the appropriate environment and starts the XafApplication instance, in particular, additional modules with Cfg prefix will be loaded. These modules is intended to configure the appropriate services via the XAS, they contains neccesary Controllers, Editors etc. The hosts mechanism serves all types of applications in the same way, see AppHosts.
Right-click the XafariSample.Cfg project in the Solution Explorer and choose Debug | Start new instance from the context menu.
When starting, the XAS displays a dialog box and requires the target application’s config file. You need to browse and specify the App.config file of the XafariSample Win-app.
Then, the logon window will be displayed. XAS uses the same Authorization and Security Systems that were specified in the AppModule. As described above, use your Windows account and log in as an administrator.
Since no additional Services are considered in this guide, the XAS will work in the default configuration. This provides access to the Security and Model. If there are any Сfg modules, the navigation bar will be expanded with the corresponding items. It should be noted that Docflow also assumes XAS support, the Docflow.Cfg module will be released in future versions.
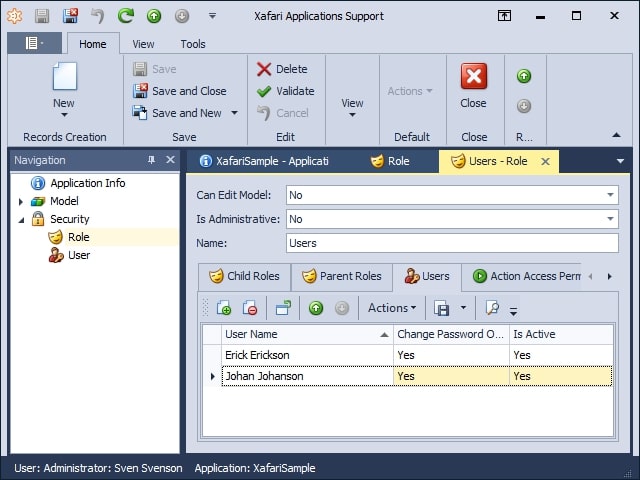
Next, configure roles and users. There are two roles by default: Administrator and Users. Invoke the Users Detail View and add a new Type Permission, set its Target Type property to the “Docflow Document” value and allow all operations. Also add the Read permission for the Employee type.
Then, create two users, specify Erick Erickson and Johan Johanson as the new objects’ names and assign them to the Users role.
Docflow. Schema Design
This topic demonstrates how to design a simple Schema.
Before diving into the Schema, select the Participants node and add two items to it: Eric Erickson and Johan Johanson. Thus, it was possible to set the Task Executor directly in the Application Model.
In the Solution Explorer, select the XafariSample.Module project and invoke the Model Editor. Locate the Xafari|Docflow|Documents|Docflow Document|Schemas node, add a new Shema item and set Id property to the “OrdinarySchema” value.
In the Docflow context, there are internal concepts of Properties and Actions. These should be distinguished from the more global Class Properties and XAF Actions. In this topic, Properties and Actions should always be treated as Docflow terms.
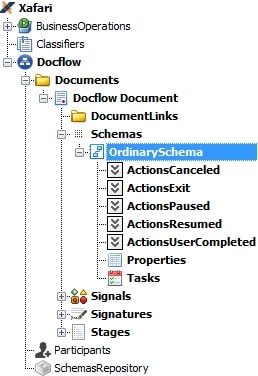
Actions
Action is a predefined elementary operation that affects the processing flow of a Document. Actions include editing data, starting a Business Operation, performing an XAF Action, sending an email, approving a Signature, etc. Actions can be aggregated in a Schema, Task or Task Group. The executor of the Action can be a user or a system. System Actions are performed only at certain moments, for example, pausing a Scheme, receiving a Signal, completing a Task, etc.
The image above shows the Actions nodes at the Schema level, the nodes are correlated with the certain events. Actions within the Task will be described below.
Properties
The DocflowDocument class described in the Docflow: Axial Entity topic provides only a common set of properties, its data schema is quite ascetic. It is obvious that any production Document should have its own unique structure, which reflects its specificity. One of the key features of Docflow is the ability to avoid a hard definition of the Document structure at the stage of persistent coding. DocflowDocument is associated with the Schema, and the data structure of the OrdinarySchema can be defined in the Properties node. In runtime, the system will analyze this node, dynamically generate the necessary types and add them to the OrdinarySchema object. This capability is based on Dynamic Properties technology. This topic introduces you to Docflow Properties.
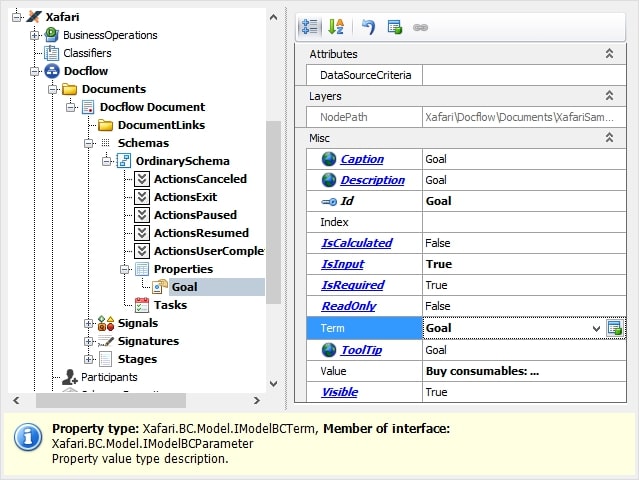
Focus the Properties node and select Add…|Property from the context menu. Set item properties according to the table below:
| Property | Value | Description |
| Id | Goal | |
| IsInput | True | value must be set when creating the document |
| Value | Buy consumables: ... | default value, incl. calculated |
To specify the type of Property, use the Term. Term provides a flexible binding of a Property to a type and controls some aspects of its display. Navigate to the Xafari | Terms node, create a new BCTerm item and set its properties according to the table below:
| Property | Value | Description |
| Id | Goal | |
| Type | System.String | |
| AllowEdit | True | |
| MaxLength | 300 |
Return to the OrdinarySchema | Properties | Goal node and set the Term property to the “Goal”.
Other Properties and parameters are listed in the following table. Add them to the Schema. When describing the relevant Terms set AllowEdit to “True” and MaxLength to “300”, if the type is System.Decimal, then set the EditMask to “###########0.0000”.
| Id | Value | IsInput | Term / Type |
| Goal | Buy consumables: ... | True | System.String |
| Employee | True | DocFlowDC.Module.BusinessObjects.Employee | |
| Plan Start | =Today() | False | System.DateTime |
| Plan End | =AddDays(Today(), 3) | False | System.DateTime |
| Planned Amount | True | System.Decimal | |
| Rate | =1,25 | False | System.Decimal |
| Issued Amount | =[Property.Planned Amount] * [Property.Rate ] | False | System.Decimal |
| Payment Document | False | System.Drawing.Image | |
| Fact Start | False | System.DateTime | |
| Fact End | False | System.DateTime | |
| Actual Amount | False | System.Decimal | |
| Refunded Amount | =[Property.Issued Amount] - [Property.Actual Amount] | False | System.Decimal |
For the Issued Amount and Refunded Amount Properties set the IsCalculated parameter to the True value.
Tasks
Focus the Tasks node and select Add…| Group from the context menu. For the newly created node, set the Id property to the “TaskGroup” value.
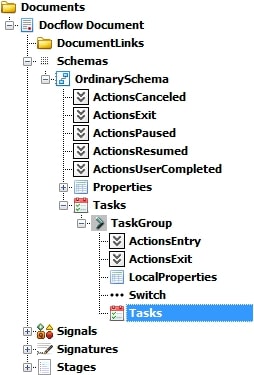
The Task Group is an intermediate unit in the construction of the Scheme. Its structure and parameters largely coincide with a single Task.
- AuctionsEntry and ActionsExit collections contain Actions to be performed automatically at the moments of entry and exit, respectively.
- LocalProperties collection contains links to Properties from the Scheme (or Template)
- Switches allow non-linear execution of the Scheme.
- Tasks node contains child Tasks or Task Groups.
Next, two standard Tasks will be created, the essence of which is to ensure that the user has read the instructions, edited some fields and confirmed the results. This typical pattern can be applied to many business situations.
Planning Task
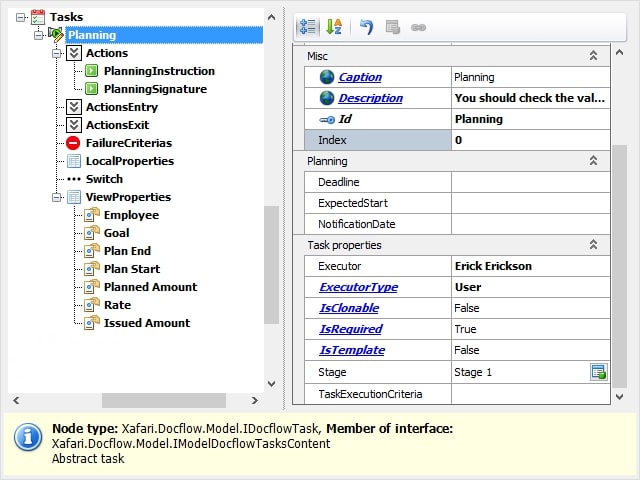
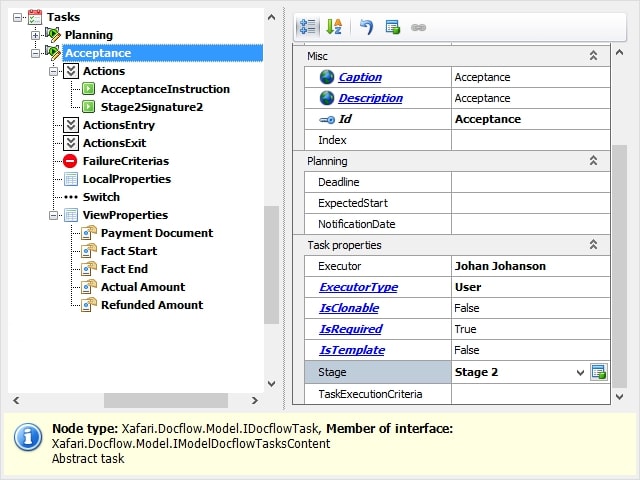
Add a new Task to the Tasks node. For the newly created node, set its properties according to the table below:
| Property | Value |
| Id | Planning |
| ExecutorType | User |
| Executor | Erick Erickson |
| Description | You should check the values, adjust them if necessary. Change the Rate to affect the Issued Amount. Save the results and approve your decisions. |
| Stage | Stage 1 |
Focus the ViewProperties node and add 7 new child items to it. Set the Property parameter to bind these items to the Schema Properties as shown in the image below:
Right-click the Actions node and select Action – Instruction, for the new node, set the Id property to "PlanningInstruction".
Than right-click the Actions node and select Action – Approve signature. This item requires you to specify the Signature property, set it to “Stage1Signature1” and set the Id property to the “PlanningSignature” value.
Acceptance Task
The next step is to add a second Task and configure as specified in the table below:
| Property | Value |
| Id | Acceptance |
| ExecutorType | User |
| Executor | Johan Johanson |
| Description | You should to fix the final results of the event. Transfer the values from the payment document to the appropriate fields, attach its scan copy and approve the operation. |
| Stage | Stage 2 |
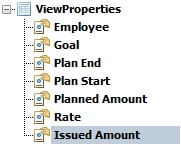
Navigate the ViewProperties node and add the remaining Schema Properties to it.
Than configure the Actions node. Add Action – Instruction and set the Id property to "AcceptanceInstruction". Add Action – Approve signature, set the Signature property to the “Stage2Signature2” value and set the Id property to the “AcceptanceSignature” value.
As a result, the OrderedScheme is designed, it includes two Tasks assigned to different Participants.
Document Execution
This topic describes how the OrderedScheme processes the DocflowDocument in runtime, this will require the use of two accounts that have been added in the XAS: Create Users topic.
Run the XafariSample.Win application. In the invoked logon window select Standard Authentication and and log in as Erick Erickson.

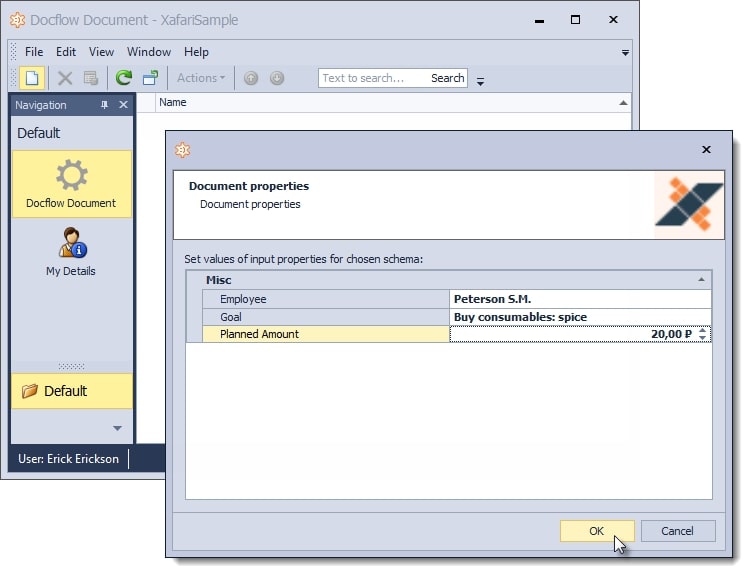
Select the Docflow Document item in the navigation control and click the New Action. When creating a Document, the sysnem runs the Wizard that prompts the user to select a Schema, if there are more than one, and then offers to set the Properties that were specified as IsInput.
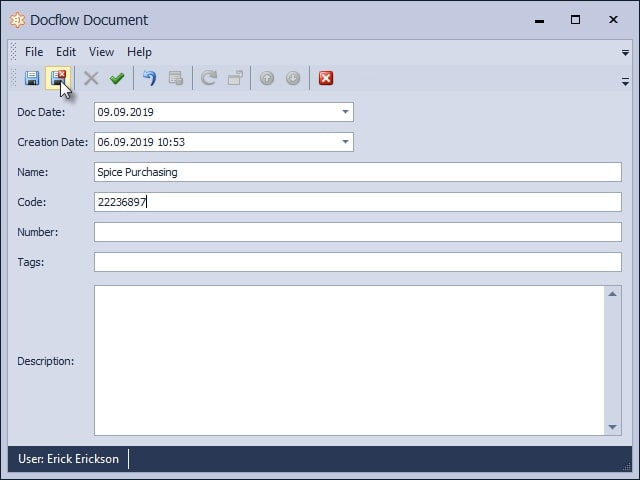
After the Wizard is finished, the standard Detail View will invoke. Set the persistent properties of the DocflowDocument object and save it.
The described scenario is greatly simplified. In reality, an ordinary Task Executor should not have the permissions to create a Document, however, it does not make sense to further complicate this example.
After the object is saved, Docflow begins to execute the Scheme. Signatures and Properties are generated at this moment, Tasks and Groups are generated as needed. Document management is provided by a special control - Schema Panel.
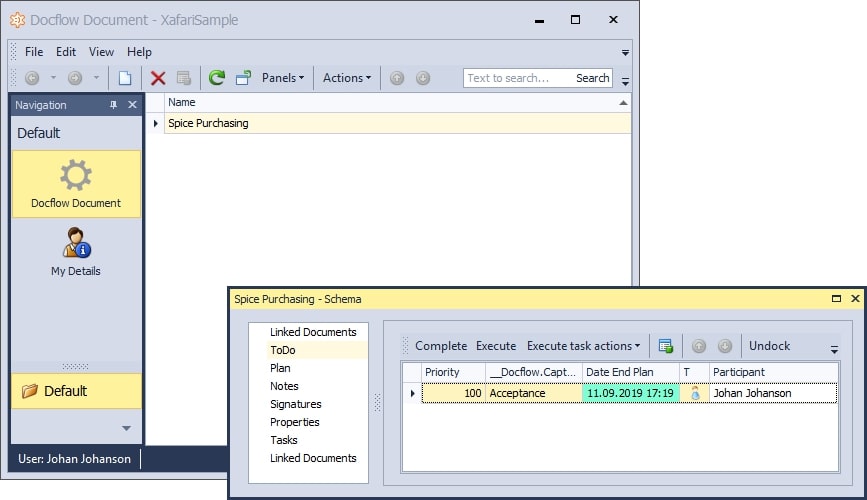
Focus the Docflow Document object in the List View, press the Panels Action and select the Shema item in the drop-down list. Schema View is displayed within the Dock Panel, this form can be placed in the workspace arbitrarily, you can undock it from the default side and resize it.
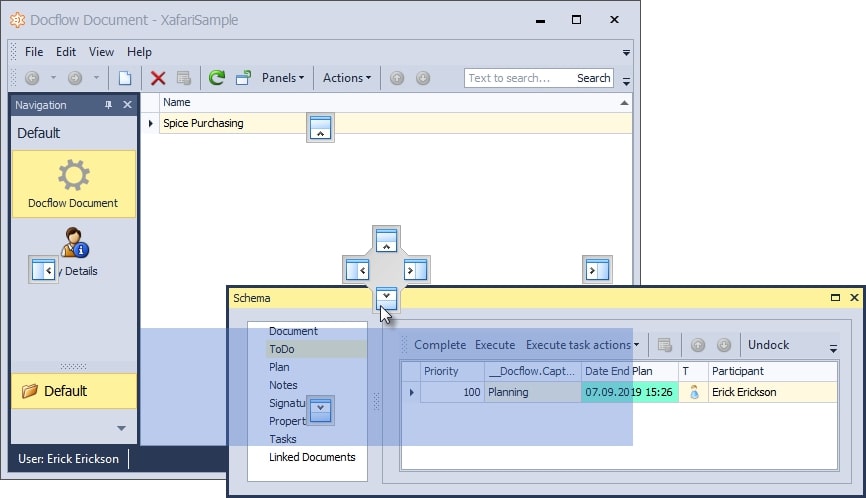
Schema Panel includes many tabbed windows for controlling various aspects of the current Document and performing operations.
- Document: main details of the current Document
- ToDo: current user Task list
- Plan: Document stages and key dates
- Notes: list to view and add comments
- Signatures: list of all Signatures and their current status
- Properties: Document Properties сard
- Tasks: complete chronology of Document execution
- Linked Documents: list of related Documents defined in the Scheme (if any)
Select the ToDo section and see that the current user (Erick Erickson) has one Task to perform. Click the Execute Action to invoke the Task Detail View.
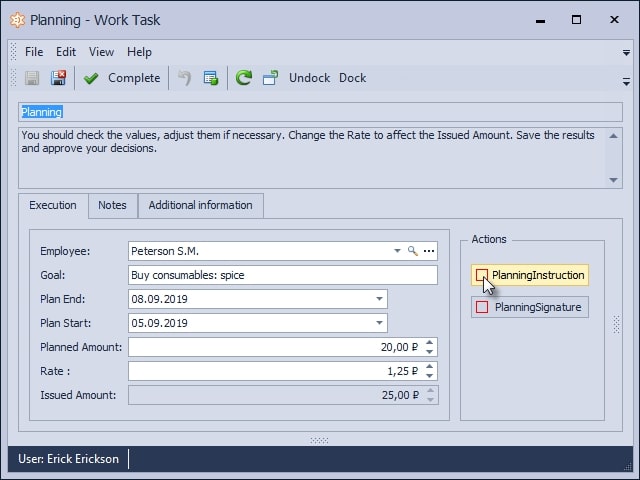
The main objects on the Task form are its Properties and Actions. The form also provides some additional information. To complete the Task, the user must sequentially execute all the Actions. If necessary, the user can edit the available Properties or use them in other ways.
Click the PlanningInstruction Action.
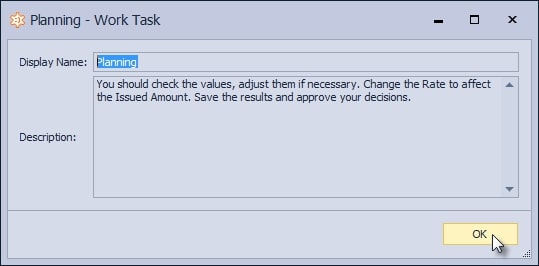
This operation explicitly obliges the user to read the instructions and confirm it. Instructions usually relate to the following Actions and editing Properties. Click OK and continue the Task.
Modify and save the values and execute the PlanningSignature Action.
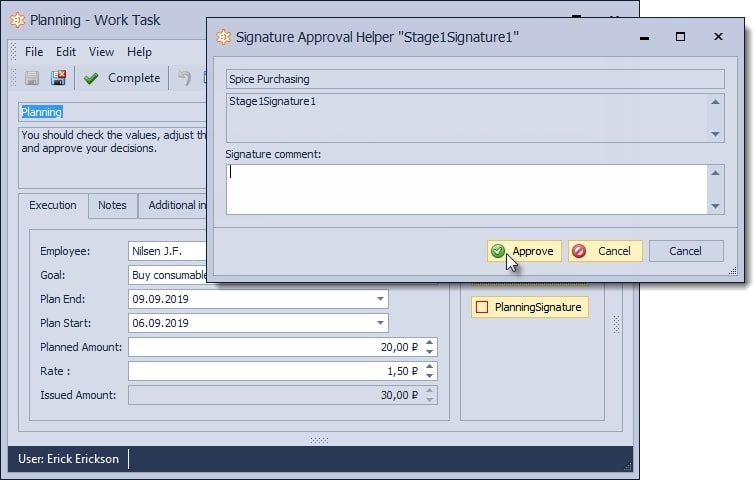
This operation can have only two possible outcomes and involves the opportunity to comment on the decision. Click Approve and continue the Task.
After all the required Actions are executed, the user can complete the Task. To do this, click Complete Action that prompts the completion dialog.
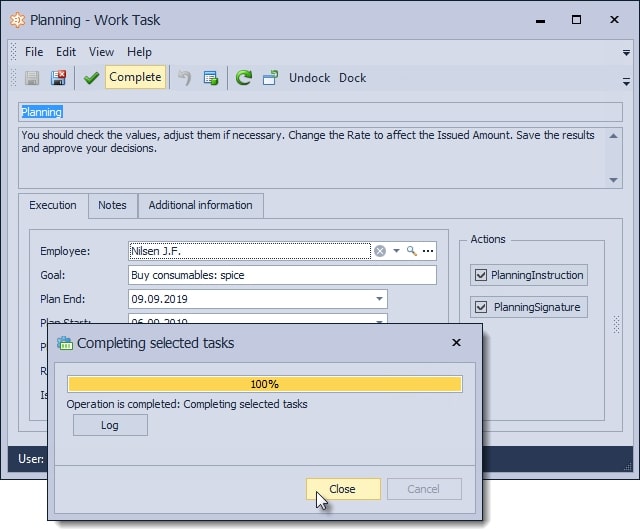
If the completion is successful, the service will create the next Task in the queue. Further it is necessary to log in with the credentials of Johan Johanson and execute the Acceptance Task assigned to this Participant.
The structure of this Task is similar to the previous one and it is performed in the same way.
