This post explains how to add, customize and use Xafari Audit Module. We will create a simple demo XAF application and consider a step by step deployment of Audit in this example.We will use Xafari x07. It is worth noting that the main distinguishing feature of Xafari Audit is its performance.
Create new XAF Windows application, name it AuditSample.
Add XafariBCAuditModule and XafariBCAuditTriggersModule to the platform independent module (in our case it is AuditSample.Module).
Add XafariBCAuditWinModule to the Win module.
This Audit version also requires to add some modules manually:
Add XafariBusinessOperationsModule, XafariBCSettingsModule, XafariEditorsModule to the platform independent module.
Add XafariEditorsWinModule to the Win module.
Audit Module uses Application Settings to store configuration. To use Application Settings, you need to implement a SettingsAccessor descendant. The code snippet below represents AuditSettingsAccessor, which supports the work of the Audit:
1 2 3 4 5 6 7 8 9 10 11 12 13 14 15 | public class AuditSettingsAccessor : SettingsAccessor { public AuditSettingsAccessor(XafApplication application) : base(application) { RootSlice = new AuditDefaultSlice(); } public class AuditDefaultSlice : SettingDefaultValueSlice { public override IEnumerable GetChildrenFromNextSlice() { return new List(); } } } |
To initialize AuditSettingsAccessor, use Application_LoggedOn event handler in the platform independent module as follows:
1 2 3 4 5 6 7 8 9 10 11 12 | public override void Setup(XafApplication application) { base.Setup(application); Application.LoggedOn += Application_LoggedOn; } void Application_LoggedOn(object sender, LogonEventArgs e) { var application = sender as XafApplication; if (application == null) return; SettingsAccessor.Instance = new AuditSettingsAccessor(application); } |
Now the common preparation of Xafari Audit is completed. We need to define the audited entity. In this example, it is Employee. Employee.cs file is located in the AuditSample|AuditSample.Module|BusinessObjects folder of solution ( AuditSample). Employee class implements IAuditSupport interface.
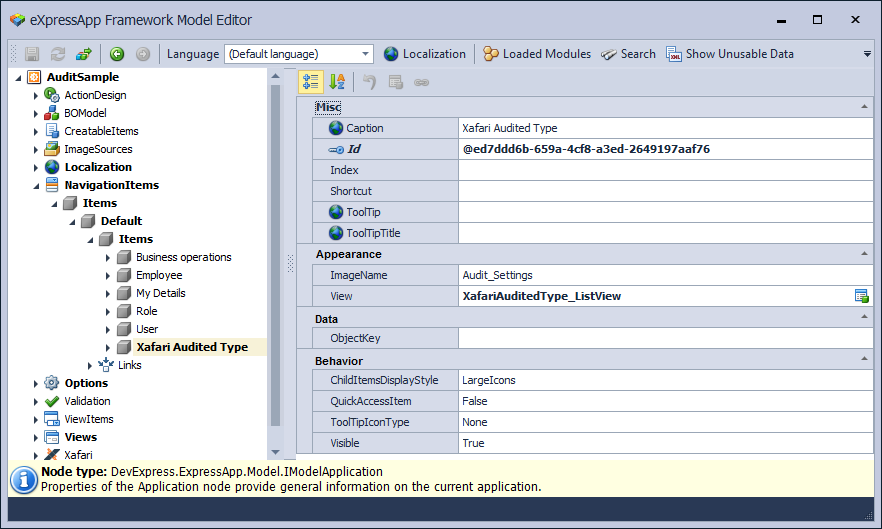
Invoke and navigate to the NavigationItems|Items|Default|Items node. Add new item, set View property to "XafariAuditedType_ListView" value.
Xafari audit module
Build and run solution. Now you only configure Audit in the application.
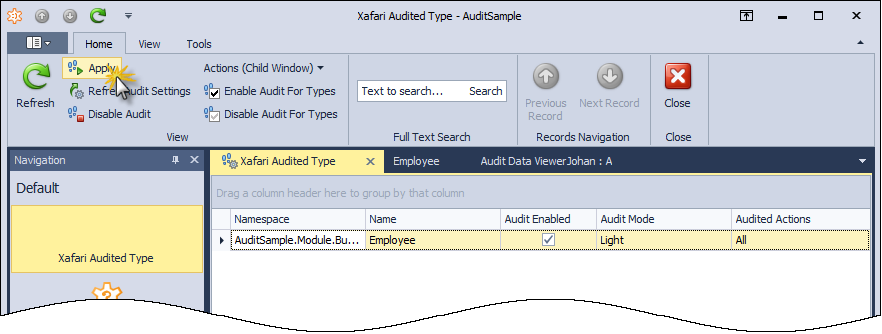
Select the Xafari Audited Type item in the navigation control and click the Apply Action in the invoked View. For the Employee type set Audit Enabled property to "True".
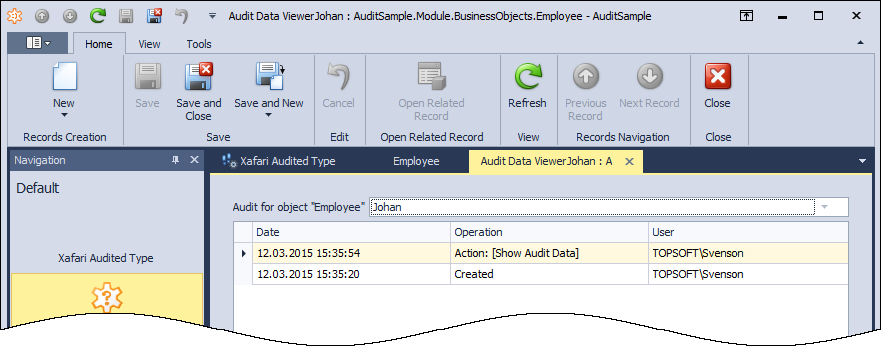
Select Employee Navigation Item and invoke Employee List View, create (edit) and save new objects. For selected object click Show Audit Data Action, as shown in the image below.
Now you can view all of the changes that have occurred with this object.